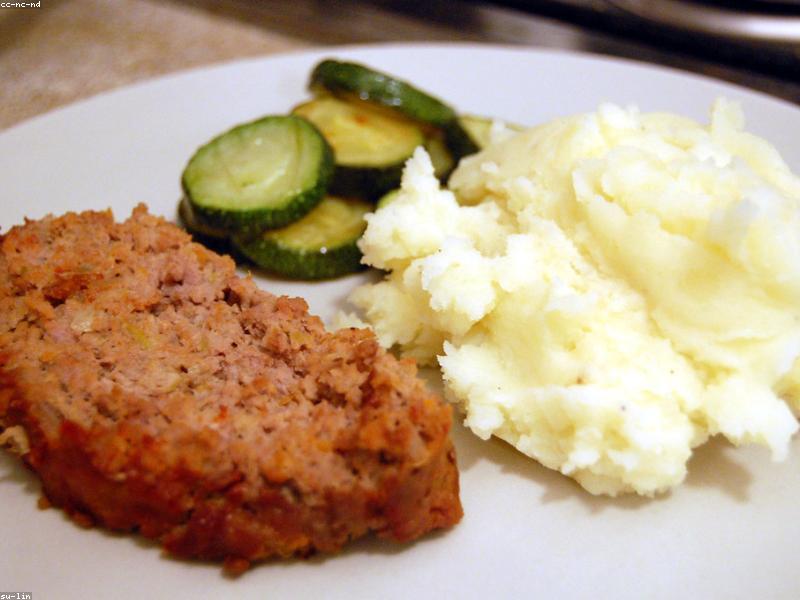
Classic Homemade Meatloaf Recipe (2026 Viral Recipe). This recipe has gone viral for a reason: it’s quick, easy, and incredibly delicious.
Below you will find the step-by-step instructions to make this amazing dish at home.
Introduction
Ah, meatloaf – the ultimate comfort food classic. A hearty, satisfying dish that never fails to hit the spot. But let’s be real, not all meatloaves are created equal. In fact, many store-bought or restaurant versions can be dry, bland, and lacking in texture. That’s why we’re going back to basics with this classic homemade meatloaf recipe. With a few simple tweaks and attention to detail, you’ll be enjoying a mouthwatering masterpiece that’s sure to become a family favorite.
Ingredients
- 1 lb ground beef (80/20 or 70/30 lean to fat ratio works best)
- 1 medium onion, finely chopped
- 2 cloves of garlic, minced
- 1 cup breadcrumbs (plain or Italian-style work well)
- 1 egg
- 1/2 cup ketchup
- 1 tablespoon Worcestershire sauce
- 1 teaspoon dried oregano
- Salt and pepper, to taste
- Optional: chopped bell peppers, mushrooms, or other vegetables of your choice
Step-by-Step Instructions
1. Preheat your oven to 375°F (190°C). Yes, you read that right – not 350°F, but a full 375°F! This will ensure a nice browning on the outside and a juicy interior.
2. In a large mixing bowl, combine the ground beef, chopped onion, minced garlic, breadcrumbs, egg, ketchup, Worcestershire sauce, dried oregano, salt, and pepper. Mix everything together with your hands or a wooden spoon until it’s just combined – don’t overmix!
3. Transfer the meat mixture to a loaf pan or shape it into a loaf on a baking sheet lined with parchment paper.
4. If desired, add some chopped bell peppers or mushrooms to the top of the meatloaf for added flavor and texture.
5. Place the meatloaf in the oven and bake for 45-50 minutes, or until it reaches an internal temperature of 160°F (71°C). You might need to adjust the cooking time depending on your oven’s temperature accuracy.
6. Remove the meatloaf from the oven and let it rest for 10-15 minutes before slicing and serving.
Pro Tips for Success
* Use high-quality ground beef that’s fresh and not frozen.
* Don’t overmix the meat mixture – this can lead to a dense, dry final product.
* If you’re worried about the meatloaf drying out, try covering it with foil during the last 20 minutes of baking.
* Experiment with different seasonings or toppings to give your meatloaf a unique twist. Some ideas include:
+ Adding diced bacon or chopped jalapeños for added smokiness
+ Sprinkling grated cheddar cheese on top before serving
+ Using beef broth instead of ketchup for a richer flavor
Frequently Asked Questions
Q: Can I make this recipe in advance?
A: Yes! You can prepare the meat mixture and shape it into loaves or balls, then store them in the refrigerator for up to 24 hours before baking. Just be sure to adjust the cooking time accordingly.
Q: How do I get a nice crust on my meatloaf?
A: A combination of high-temperature baking and using breadcrumbs as a topping can help achieve that perfect crust. You can also try brushing the top with a little olive oil or melted butter before serving.
Q: Is this recipe suitable for vegetarians or vegans?
A: Unfortunately, no – this classic homemade meatloaf recipe is designed specifically for meat-lovers! However, you could consider substituting ground beef with ground turkey, chicken, or tofu to create a vegetarian or vegan version. Just be sure to adjust the cooking time and seasoning accordingly.
And there you have it – our beloved classic homemade meatloaf recipe, perfect for any occasion. Whether you’re a seasoned cook or just starting out in the kitchen, this tried-and-true formula is sure to become a staple in your household. So go ahead, get cooking, and enjoy every juicy bite!
💡 Pro Tips for Perfect Air Frying
- Space is Key: Don’t overcrowd the basket for max crispiness. 🌬️
- Preheat: A preheated air fryer gives better results. 🔥
- Shake: Flip halfway for even browning. 🔄
💡 Master Your Air Fryer: Pro Tips
- Airflow: Don’t crowd the basket. 🌬️
- Preheat: 3-5 mins for best results. 🔥
- Shake: Flip halfway for even browning. 🔄
Why You Should Use an Air Fryer for This Recipe
Using an air fryer is a game-changer for this recipe. Unlike traditional frying, it uses up to 95% less oil, making your meal significantly healthier without sacrificing that delicious crunch. Plus, it is faster than a conventional oven and doesn’t heat up your entire kitchen.
Pro Tips for Perfection
- Don’t Overcrowd: Always cook in a single layer to ensure the hot air circulates evenly.
- Preheat: Taking 3 minutes to preheat your air fryer ensures the food starts cooking immediately for a crispier texture.
- Shake It: Shake the basket halfway through cooking to ensure even browning on all sides.
How to Store and Reheat
If you have leftovers (which is rare!), store them in an airtight container in the refrigerator for up to 3 days. To reheat, simply pop them back in the air fryer at 350°F for 3-4 minutes until they are crispy again. Do not use a microwave, as it will make them soggy.
🔥 Join Our Viral Foodie Community!
Don’t miss out on the latest air fryer trends. Follow us now:
📌 Pin This Recipe!
Save to your Air Fryer board.